If the question is How to call AS400 DB2 RPG calls from WSO2 ESB, then the answer is PCML connector. It is a very convenient way to call RPG calls, as it can be done by doing only few configurations, with zero code. The rest is handled by WSO2 ESB!!.
A bit about RPG
RPG stands for Report Program Generator, and it a high level programing language specific for IBM AS400, More on RPG.
PCML Connector
A complete guide is in WSO2 ESB Connector documentation.
In order to call an RPG there are only few steps.
1. Save .pcml file in the registry. This should contain the RPG library string and the parameters (both input and output). When the parameters are defined the parameter type, length should be matched as in IBM documentation. For an example, if the parameter is a String value then the type should be char and the length should be matched to the length of the String.
2. pcml.init config in the calling synapse config should be defined. Under that, the server ip, username, password should be defined
3. The payload factory mediator can be defined to pass the payload with the parameters.
4. The pcml.call config to configure the .pcml file location and to call the PCML connector to get the things done.
Sunday, September 3, 2017

Thursday, August 3, 2017
Benefits of WSO2 ESB
WSO2 ESB is a cloud enabled, 100% open source integration solution which is a standards-based messaging engine that provides the value of messaging
without writing code. Instead of having your heterogeneous enterprise applications and systems, which are using various standards and protocols, communicate point-to-point with each other, you can simply integrated with WSO2 ESB, which handles transforming and routing
the messages to the appropriate destinations.
It also compromises of
- data integration capabilities, eliminating the need to use a separate data services server for your integration processes.
- managing long-running, stateful business processes.
- analytics capabilities for comprehensive monitoring
- message brokering capabilities that can be used for reliable messaging
- capabilities to run microservices for your integration flows.
Other than those key features, some benefits of having WSO2 ESB are,
Find more on WSO2 ESB from:
http://wso2.com/library/articles/2017/07/what-is-wso2-esb/
It also compromises of
- data integration capabilities, eliminating the need to use a separate data services server for your integration processes.
- managing long-running, stateful business processes.
- analytics capabilities for comprehensive monitoring
- message brokering capabilities that can be used for reliable messaging
- capabilities to run microservices for your integration flows.
Other than those key features, some benefits of having WSO2 ESB are,
- Enables communication among various heterogeneous applications and systems
- 100% open source, lightweight, and high performance
- Support for open standards such as REST, SOAP, WS-*
- Support for domain specific solutions (SAP, FIX, HL7)
- Support message format transformation
- Supports message routing
- Supports message enrichment
- 160+ Connectors (A ready made tool that can be used to connect to public web APIs) such as Salesforce, JIRA, Twitter, LDAP, Facebook and more)
- Supports wider range of integration scenarios, known as EIP patterns
- Having Scalable and extensible architecture
- Easy to configure and re-use, tooling support via Developer Studio, which is an eclipse based tool for artifact design
- Equipped with ESB analytics, for real time monitoring
Find more on WSO2 ESB from:
http://wso2.com/library/articles/2017/07/what-is-wso2-esb/
Tuesday, May 23, 2017
WSO2 ESB Message Flow
WSO2 ESB is a lightweight open source and high performing ESB. It is built on Synpase, which acts as the mediation engine.
This blog post describes the message flow of ESB at the synapse level from the client to backend and then backend to client.
To trace the message flow we can deploy a proxy service and invoke that,
<?xml version="1.0" encoding="UTF-8"?>
<proxy xmlns="http://ws.apache.org/ns/synapse"
name="TestProxy"
startOnLoad="true"
statistics="disable"
trace="disable"
transports="https,http">
<target>
<inSequence>
<log/>
<send>
<endpoint>
<address uri="http://www.mocky.io/v2/5924085b100000771e003629"/>
</endpoint>
</send>
</inSequence>
</target>
<description/>
</proxy>
When a request comes from the client side, at the synapse level, it first hits the receive method in ProxyServiceMessageReceiver. This is the message flow in the request flow,
org.apache.synapse.core.axis2.ProxyServiceMessageReceiver.receive
at this level having the axis2 message context
org.apache.synapse.core.axis2.MessageContextCreatorForAxis2.getSynapseMessageContext
get the synapse message context out of it
org.apache.synapse.core.axis2.ProxyService.registerFaultHandler
fault handler is registered for the proxy service
org.apache.synapse.mediators.base.SequenceMediator.mediate
call the mediate method in the in-sequence
org.apache.synapse.mediator.AbstractListMediator.mediate
iterates through mediators in the in-sequence
org.apache.synapse.mediators.builtin.SendMediator.mediate
org.apache.synapse.endpoints.AddressEndpoint.send
org.apache.synapse.core.axis2.Axis2Sender.sendOn
org.apache.synapse.core.axis2.Axis2FlexibleMEPClient.send
org.apache.synapse.core.axis2.SynapseCallbackReceiver.handleMessage
org.apache.synapse.core.axis2.Axis2SynapseEnvironment.injectMessage
org.apache.synapse.mediators.base.SequenceMediator.mediate()
call the mediate method in the out-sequence
org.apache.synapse.mediators.AbstractListMediator.mediate()
iterates through mediators in the out-sequence
org.apache.synapse.mediators.builtin.SendMediator.mediate()
org.apache.synapse.core.axis2.Axis2Sender.sendBack
This blog post describes the message flow of ESB at the synapse level from the client to backend and then backend to client.
To trace the message flow we can deploy a proxy service and invoke that,
<?xml version="1.0" encoding="UTF-8"?>
<proxy xmlns="http://ws.apache.org/ns/synapse"
name="TestProxy"
startOnLoad="true"
statistics="disable"
trace="disable"
transports="https,http">
<target>
<inSequence>
<log/>
<send>
<endpoint>
<address uri="http://www.mocky.io/v2/5924085b100000771e003629"/>
</endpoint>
</send>
</inSequence>
</target>
<description/>
</proxy>
When a request comes from the client side, at the synapse level, it first hits the receive method in ProxyServiceMessageReceiver. This is the message flow in the request flow,
In-Flow
org.apache.synapse.core.axis2.ProxyServiceMessageReceiver.receive
at this level having the axis2 message context
org.apache.synapse.core.axis2.MessageContextCreatorForAxis2.getSynapseMessageContext
get the synapse message context out of it
org.apache.synapse.core.axis2.ProxyService.registerFaultHandler
fault handler is registered for the proxy service
org.apache.synapse.mediators.base.SequenceMediator.mediate
call the mediate method in the in-sequence
org.apache.synapse.mediator.AbstractListMediator.mediate
iterates through mediators in the in-sequence
org.apache.synapse.mediators.builtin.SendMediator.mediate
org.apache.synapse.endpoints.AddressEndpoint.send
org.apache.synapse.core.axis2.Axis2Sender.sendOn
org.apache.synapse.core.axis2.Axis2FlexibleMEPClient.send
Out-Flow
org.apache.synapse.core.axis2.SynapseCallbackReceiver.receive
org.apache.synapse.core.axis2.SynapseCallbackReceiver.handleMessage
org.apache.synapse.core.axis2.Axis2SynapseEnvironment.injectMessage
org.apache.synapse.mediators.base.SequenceMediator.mediate()
call the mediate method in the out-sequence
org.apache.synapse.mediators.AbstractListMediator.mediate()
iterates through mediators in the out-sequence
org.apache.synapse.mediators.builtin.SendMediator.mediate()
org.apache.synapse.core.axis2.Axis2Sender.sendBack
Thursday, August 4, 2016
Guaranteed delivery of emails using WSO2 ESB and WSO2 MB
WSO2 ESB provides guaranteed message delivery through it's message store and message processor. Here, I'm going to talk about a usecase where how to send an email through its recipient even the mail server is unavailable at the time the email is sent. Let's start with the setup.
1. Download a distribution of the WSO2 ESB from here. Extract the zip file. The folder created will be referred as ESB_HOME. Download the message broker. WSO2 MB is used as the message broker in this document, therefore, download the WSO2 MB from the official site, extract the zip file. This folder will be referred as MB_HOME.
1. Download a distribution of the WSO2 ESB from here. Extract the zip file. The folder created will be referred as ESB_HOME. Download the message broker. WSO2 MB is used as the message broker in this document, therefore, download the WSO2 MB from the official site, extract the zip file. This folder will be referred as MB_HOME.
2. As we are going to mailto transport to send mails, uncomment the mailto TransportSender and TransportReceiver from axis2.xml in the ESB server
ie. ESB_HOME/conf/axis2.xml
<transportSender name="mailto" class="org.apache.axis2.transport.mail.MailTransportSender">
<parameter name="mail.smtp.host">smtp.gmail.com</parameter>
<parameter name="mail.smtp.port">587</parameter>
<parameter name="mail.smtp.starttls.enable">true</parameter>
<parameter name="mail.smtp.auth">true</parameter>
<parameter name="mail.smtp.user">email.user</parameter>
<parameter name="mail.smtp.password">email.user.password</parameter>
<parameter name="mail.smtp.from">email.user@gmail.com</parameter>
</transportSender>
<transportReceiver name="mailto" class="org.apache.axis2.transport.mail.MailTransportListener">
</transportReceiver>
</transportReceiver>
You have to give the senders credentials and the mail servers details under transportSender section
3. Copy the following JAR files from the <MB_HOME>/clent-lib directory to the <ESB_HOME>/repository/components/lib directory
- andes-client-3.0.1.jar
- geronimo-jms_1.1_spec-1.1.0.wso2v1.jar
4. Open <ESB_HOME>/repository/conf/jndi.properties file and make a reference to the running Message Broker as specified below:
- Use carbon as the virtual host.
- Define a queue named JMSMS
- Comment out the topic, since it is not required in this scenario. However, in order to avoid getting the javax.naming.NameNotFoundException:TopicConnectionFactory exception during server startup, make a reference to the Message Broker from the TopicConnectionFactory as well.
5. Now the ESB server is configured. Then we have to configure MB server. Uncomment the jms transport receiver and sender for WSO2 MB in axis2.xml
<transportReceiver name="jms" class="org.apache.axis2.transport.jms.JMSListener">
<parameter name="myTopicConnectionFactory" locked="false">
<parameter name="java.naming.factory.initial" locked="false">org.wso2.andes.jndi.PropertiesFileInitialContextFactory</parameter>
<parameter name="java.naming.provider.url" locked="false">repository/conf/jndi.properties</parameter>
<parameter name="transport.jms.ConnectionFactoryJNDIName" locked="false">TopicConnectionFactory</parameter>
<parameter name="transport.jms.ConnectionFactoryType" locked="false">topic</parameter>
</parameter>
<parameter name="myQueueConnectionFactory" locked="false">
<parameter name="java.naming.factory.initial" locked="false">org.wso2.andes.jndi.PropertiesFileInitialContextFactory</parameter>
<parameter name="java.naming.provider.url" locked="false">repository/conf/jndi.properties</parameter>
<parameter name="transport.jms.ConnectionFactoryJNDIName" locked="false">QueueConnectionFactory</parameter>
<parameter name="transport.jms.ConnectionFactoryType" locked="false">queue</parameter>
</parameter>
<parameter name="default" locked="false">
<parameter name="java.naming.factory.initial" locked="false">org.wso2.andes.jndi.PropertiesFileInitialContextFactory</parameter>
<parameter name="java.naming.provider.url" locked="false">repository/conf/jndi.properties</parameter>
<parameter name="transport.jms.ConnectionFactoryJNDIName" locked="false">QueueConnectionFactory</parameter>
<parameter name="transport.jms.ConnectionFactoryType" locked="false">queue</parameter>
</parameter>
</transportReceiver>
<transportSender name="jms" class="org.apache.axis2.transport.jms.JMSSender"/>
6. As we are running two carbon servers on the same machine, apply a port offset in the <MB_HOME>/repository/conf/carbon.xml file by changing the offset value to 1. For example,
<Ports>
<!-- Ports offset. This entry will set the value of the ports defined below to
the define value + Offset.
e.g. Offset=2 and HTTPS port=9443 will set the effective HTTPS port to 9445
-->
<Offset>1</Offset>
7. Start the ESB server and MB server
8. On ESB server Create the failover message store
In this example usecase an in-memory message store is used to create the failover message store.
<messageStore name="Failover"/>

9. Create the original message store as illustrated in the diagram. I have used JMS message store for this purpose. When creating the original message store, you need to enable guaranteed delivery on the producer side. A sample config would be as below,
<messageStore name="Original" class="org.apache.synapse.message.store.impl.jms.JmsStore" xmlns="http://ws.apache.org/ns/synapse">
<parameter name="java.naming.factory.initial">org.wso2.andes.jndi.PropertiesFileInitialContextFactory</parameter>
<parameter name="java.naming.provider.url">repository/conf/jndi.properties</parameter>
<parameter name="store.jms.JMSSpecVersion">1.1</parameter>
<parameter name="store.producer.guaranteed.delivery.enable">true</parameter>
<parameter name="store.failover.message.store.name">Failover</parameter>
</messageStore>

10. Create a proxy service to send the email to designation. This proxy is treated as the backend service which calls the mail server and delivers the emails.
<proxy xmlns="http://ws.apache.org/ns/synapse"
name="MailToProxy"
transports="https,http"
statistics="disable"
trace="disable"
startOnLoad="true">
<target>
<inSequence>
<property name="senderAddress" value="chanika1118@gmail.com"/>
<log level="full">
<property name="Sender Address" expression="get-property('senderAddress')"/>
</log>
<property name="FORCE_SC_ACCEPTED" value="true" scope="axis2"/>
<property name="OUT_ONLY" value="true"/>
<property name="Subject" value="This is a test" scope="transport"/>
<property name="messageType" value="text/plain" scope="axis2-client"/>
<script language="js">mc.setPayloadXML(<ns:text xmlns:ns="http://ws.apache.org/commons/ns/payload">Plain text received!</ns:text>);</script>
<header name="To"
expression="fn:concat('mailto:', get-property('senderAddress'))"/>
<log level="full">
<property name="message" value="Response message"/>
<property name="Sender Address" expression="get-property('senderAddress')"/>
</log>
<send/>
</inSequence>
<outSequence>
<send/>
</outSequence>
<faultSequence>
<property name="FORCE_SC_ACCEPTED" value="true" scope="axis2"/>
<property name="OUT_ONLY" value="true"/>
<log level="full"/>
<store messageStore="Failover"/>
</faultSequence>
</target>
<description/>
</proxy>
As you can see, if there is an error occurred when sending the email, it goes to the fault sequence and within the fault sequence it calls the ‘Failover’ message store in order to make sure that the message will be delivered when the connectivity is back.
11. Add Endpoint to call the proxy service
<endpoint xmlns="http://ws.apache.org/ns/synapse" name="MailDeliveryService">
<address uri="http://localhost:8280/services/MailToProxy">
<suspendOnFailure>
<progressionFactor>1.0</progressionFactor>
</suspendOnFailure>
<markForSuspension>
<retriesBeforeSuspension>0</retriesBeforeSuspension>
<retryDelay>0</retryDelay>
</markForSuspension>
</address>
</endpoint>
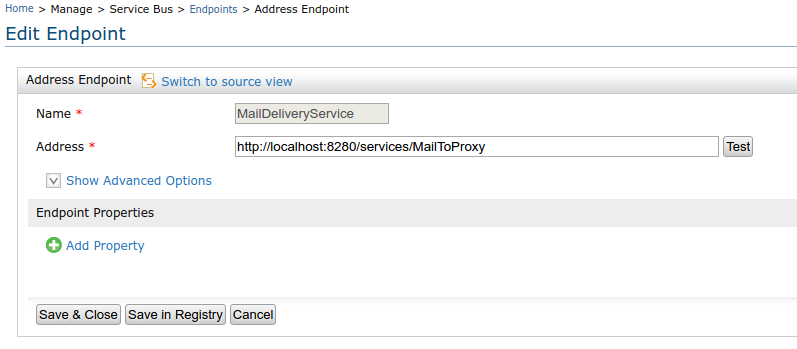
12. Add a proxy service to invoke the mail delivery endpoint.
<proxy xmlns="http://ws.apache.org/ns/synapse"
name="SampleProxy"
transports="https,http"
statistics="disable"
trace="disable"
startOnLoad="true">
<target>
<inSequence>
<send>
<endpoint key="MailDeliveryService"/>
</send>
</inSequence>
</target>
<description/>
</proxy>
13. Add Scheduled Message Forwarding Processor to forward the request to the defined endpoint.
<messageProcessor name="ForwardMessageProcessor" class="org.apache.synapse.message.processor.impl.forwarder.ScheduledMessageForwardingProcessor" targetEndpoint="MailDeliveryService" messageStore="Original" xmlns="http://ws.apache.org/ns/synapse">
<parameter name="interval">1000</parameter>
<parameter name="client.retry.interval">1000</parameter>
<parameter name="max.delivery.attempts">4</parameter>
<parameter name="is.active">true</parameter>
<parameter name="max.delivery.drop">Disabled</parameter>
<parameter name="member.count">1</parameter>
</messageProcessor>
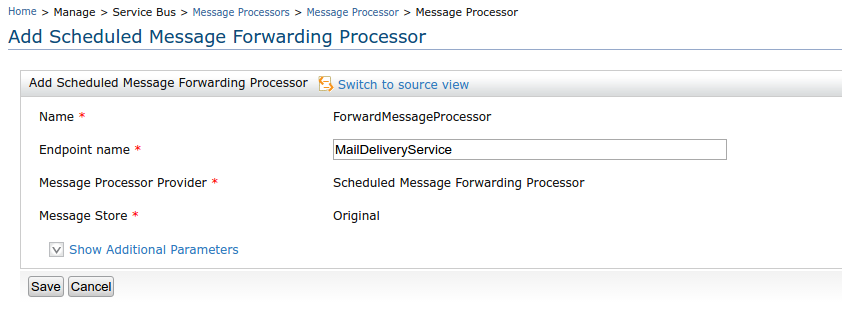
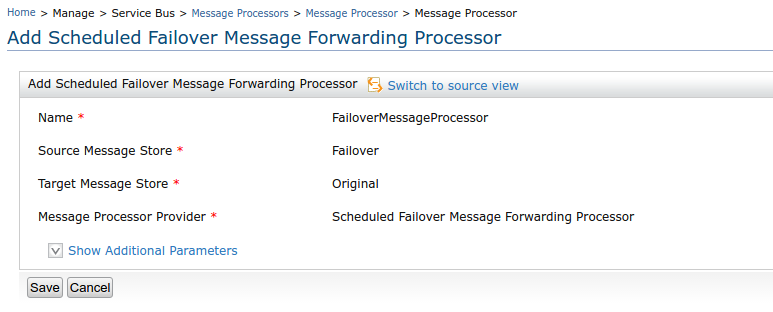
14. Add Scheduled Failover Message Forwarding Processor to send messages from the failover store to the original store when it is available in the failover scenario. In there you have to define the source message store (which is failover store in our scenario) and the target message store (which is original message store in our scenario)
<messageProcessor name="FailoverMessageProcessor" class="org.apache.synapse.message.processor.impl.failover.FailoverScheduledMessageForwardingProcessor" messageStore="Failover" xmlns="http://ws.apache.org/ns/synapse">
<parameter name="interval">1000</parameter>
<parameter name="client.retry.interval">60000</parameter>
<parameter name="max.delivery.attempts">1000</parameter>
<parameter name="is.active">true</parameter>
<parameter name="max.delivery.drop">Disabled</parameter>
<parameter name="member.count">1</parameter>
<parameter name="message.target.store.name">Orginal</parameter>
</messageProcessor>
Now everything is setup. It is time to test the scenario. You can invoke the SampleProxy and see how the mails are received to the recipient defined in the proxy service.
The failover scenario can be tested by dropping the connection between the ESB server and the mail server or shutdown the mail server. Then you can send some messages to the ESB SampleProxy service. If you check the logs you will see that the failover message processor periodically sends messages to the original message store and eventually tries to send messages to the mail server continuously through the scheduled message forwarding processor. Moreover, the emails are not sent to the receiver address since there is a connectivity issue. The message count of the failover message store is changing over time with the number of messages sent to the proxy service and the number of messages pulled out from the failover message store in order to send to the original message store.
Once you enable connectivity between the ESB server and the mail server, the messages pulled out from the failover message store are sent to the recipients.
<transportReceiver name="jms" class="org.apache.axis2.transport.jms.JMSListener">
<parameter name="myTopicConnectionFactory" locked="false">
<parameter name="java.naming.factory.initial" locked="false">org.wso2.andes.jndi.PropertiesFileInitialContextFactory</parameter>
<parameter name="java.naming.provider.url" locked="false">repository/conf/jndi.properties</parameter>
<parameter name="transport.jms.ConnectionFactoryJNDIName" locked="false">TopicConnectionFactory</parameter>
<parameter name="transport.jms.ConnectionFactoryType" locked="false">topic</parameter>
</parameter>
<parameter name="myQueueConnectionFactory" locked="false">
<parameter name="java.naming.factory.initial" locked="false">org.wso2.andes.jndi.PropertiesFileInitialContextFactory</parameter>
<parameter name="java.naming.provider.url" locked="false">repository/conf/jndi.properties</parameter>
<parameter name="transport.jms.ConnectionFactoryJNDIName" locked="false">QueueConnectionFactory</parameter>
<parameter name="transport.jms.ConnectionFactoryType" locked="false">queue</parameter>
</parameter>
<parameter name="default" locked="false">
<parameter name="java.naming.factory.initial" locked="false">org.wso2.andes.jndi.PropertiesFileInitialContextFactory</parameter>
<parameter name="java.naming.provider.url" locked="false">repository/conf/jndi.properties</parameter>
<parameter name="transport.jms.ConnectionFactoryJNDIName" locked="false">QueueConnectionFactory</parameter>
<parameter name="transport.jms.ConnectionFactoryType" locked="false">queue</parameter>
</parameter>
</transportReceiver>
<transportSender name="jms" class="org.apache.axis2.transport.jms.JMSSender"/>
6. As we are running two carbon servers on the same machine, apply a port offset in the <MB_HOME>/repository/conf/carbon.xml file by changing the offset value to 1. For example,
<Ports>
<!-- Ports offset. This entry will set the value of the ports defined below to
the define value + Offset.
e.g. Offset=2 and HTTPS port=9443 will set the effective HTTPS port to 9445
-->
<Offset>1</Offset>
7. Start the ESB server and MB server
8. On ESB server Create the failover message store
In this example usecase an in-memory message store is used to create the failover message store.
<messageStore name="Failover"/>
9. Create the original message store as illustrated in the diagram. I have used JMS message store for this purpose. When creating the original message store, you need to enable guaranteed delivery on the producer side. A sample config would be as below,
<messageStore name="Original" class="org.apache.synapse.message.store.impl.jms.JmsStore" xmlns="http://ws.apache.org/ns/synapse">
<parameter name="java.naming.factory.initial">org.wso2.andes.jndi.PropertiesFileInitialContextFactory</parameter>
<parameter name="java.naming.provider.url">repository/conf/jndi.properties</parameter>
<parameter name="store.jms.JMSSpecVersion">1.1</parameter>
<parameter name="store.producer.guaranteed.delivery.enable">true</parameter>
<parameter name="store.failover.message.store.name">Failover</parameter>
</messageStore>
10. Create a proxy service to send the email to designation. This proxy is treated as the backend service which calls the mail server and delivers the emails.
<proxy xmlns="http://ws.apache.org/ns/synapse"
name="MailToProxy"
transports="https,http"
statistics="disable"
trace="disable"
startOnLoad="true">
<target>
<inSequence>
<property name="senderAddress" value="chanika1118@gmail.com"/>
<log level="full">
<property name="Sender Address" expression="get-property('senderAddress')"/>
</log>
<property name="FORCE_SC_ACCEPTED" value="true" scope="axis2"/>
<property name="OUT_ONLY" value="true"/>
<property name="Subject" value="This is a test" scope="transport"/>
<property name="messageType" value="text/plain" scope="axis2-client"/>
<script language="js">mc.setPayloadXML(<ns:text xmlns:ns="http://ws.apache.org/commons/ns/payload">Plain text received!</ns:text>);</script>
<header name="To"
expression="fn:concat('mailto:', get-property('senderAddress'))"/>
<log level="full">
<property name="message" value="Response message"/>
<property name="Sender Address" expression="get-property('senderAddress')"/>
</log>
<send/>
</inSequence>
<outSequence>
<send/>
</outSequence>
<faultSequence>
<property name="FORCE_SC_ACCEPTED" value="true" scope="axis2"/>
<property name="OUT_ONLY" value="true"/>
<log level="full"/>
<store messageStore="Failover"/>
</faultSequence>
</target>
<description/>
</proxy>
As you can see, if there is an error occurred when sending the email, it goes to the fault sequence and within the fault sequence it calls the ‘Failover’ message store in order to make sure that the message will be delivered when the connectivity is back.
11. Add Endpoint to call the proxy service
<endpoint xmlns="http://ws.apache.org/ns/synapse" name="MailDeliveryService">
<address uri="http://localhost:8280/services/MailToProxy">
<suspendOnFailure>
<progressionFactor>1.0</progressionFactor>
</suspendOnFailure>
<markForSuspension>
<retriesBeforeSuspension>0</retriesBeforeSuspension>
<retryDelay>0</retryDelay>
</markForSuspension>
</address>
</endpoint>
12. Add a proxy service to invoke the mail delivery endpoint.
<proxy xmlns="http://ws.apache.org/ns/synapse"
name="SampleProxy"
transports="https,http"
statistics="disable"
trace="disable"
startOnLoad="true">
<target>
<inSequence>
<send>
<endpoint key="MailDeliveryService"/>
</send>
</inSequence>
</target>
<description/>
</proxy>
13. Add Scheduled Message Forwarding Processor to forward the request to the defined endpoint.
<messageProcessor name="ForwardMessageProcessor" class="org.apache.synapse.message.processor.impl.forwarder.ScheduledMessageForwardingProcessor" targetEndpoint="MailDeliveryService" messageStore="Original" xmlns="http://ws.apache.org/ns/synapse">
<parameter name="interval">1000</parameter>
<parameter name="client.retry.interval">1000</parameter>
<parameter name="max.delivery.attempts">4</parameter>
<parameter name="is.active">true</parameter>
<parameter name="max.delivery.drop">Disabled</parameter>
<parameter name="member.count">1</parameter>
</messageProcessor>
14. Add Scheduled Failover Message Forwarding Processor to send messages from the failover store to the original store when it is available in the failover scenario. In there you have to define the source message store (which is failover store in our scenario) and the target message store (which is original message store in our scenario)
<messageProcessor name="FailoverMessageProcessor" class="org.apache.synapse.message.processor.impl.failover.FailoverScheduledMessageForwardingProcessor" messageStore="Failover" xmlns="http://ws.apache.org/ns/synapse">
<parameter name="interval">1000</parameter>
<parameter name="client.retry.interval">60000</parameter>
<parameter name="max.delivery.attempts">1000</parameter>
<parameter name="is.active">true</parameter>
<parameter name="max.delivery.drop">Disabled</parameter>
<parameter name="member.count">1</parameter>
<parameter name="message.target.store.name">Orginal</parameter>
</messageProcessor>
Now everything is setup. It is time to test the scenario. You can invoke the SampleProxy and see how the mails are received to the recipient defined in the proxy service.
The failover scenario can be tested by dropping the connection between the ESB server and the mail server or shutdown the mail server. Then you can send some messages to the ESB SampleProxy service. If you check the logs you will see that the failover message processor periodically sends messages to the original message store and eventually tries to send messages to the mail server continuously through the scheduled message forwarding processor. Moreover, the emails are not sent to the receiver address since there is a connectivity issue. The message count of the failover message store is changing over time with the number of messages sent to the proxy service and the number of messages pulled out from the failover message store in order to send to the original message store.
Once you enable connectivity between the ESB server and the mail server, the messages pulled out from the failover message store are sent to the recipients.
Tuesday, July 21, 2015
Resolve - keytool error: java.lang.Exception: Failed to establish chain from reply
This blog post is related to my previous post 'Add CA signed certificate to keystore'. When you are going to import the CA signed certificate to your keystore, you may be getting the following error
keytool error: java.lang.Exception: Failed to establish chain from reply
The cause of this error
keytool error: java.lang.Exception: Failed to establish chain from reply
The cause of this error
This error occurs if
- the correct root certificate is not imported to the keystore
- the correct intermediate certificate is not imported to the keystore
The root cause is when you are going to import the signed certificate it checks whether it can create a chain from issuer and subject parameters in the imported certificate.
The solution is to
Import the correct root and intermediate which is compatible with the CA and the certificate type. For and example if you are using VeriSign you can find all the intermediate and root certificates from here.
Add CA signed certificate to keystore
A keystore is a file that keeps private keys, certificates and symmetric keys as key value pair. Each certificate is uniquely identified by an identifier called as 'Alias'. In this blog post I will go through a very common usecase where we have to get a certificate signed by CA and import that to the keystore.
As a prerequisite we have to make sure that Java is installed correctly and the class path is set. Then we can follow the following steps
1. Create a key store
You can create your own keystore by executing the following command.
keytool -genkey -alias democert -keyalg RSA -keystore demokeystore.jks -keysize 2048
You will be prompted to give below required information and a password for the keystore.
Enter keystore password:
Re-enter new password:
What is your first and last name?
[Unknown]: localhost
What is the name of your organizational unit?
[Unknown]: wso2
What is the name of your organization?
[Unknown]: wso2
What is the name of your City or Locality?
[Unknown]: colombo
What is the name of your State or Province?
[Unknown]: WP
What is the two-letter country code for this unit?
[Unknown]: LK
Is CN=localhost, OU=wso2, O=wso2, L=colombo, ST=WP, C=LK correct?
[no]: yes
Enter key password for <democert>
(RETURN if same as keystore password):
This generates a private key and the certificate with the alias specified in the command (ex: democert).
Once you executed the above command a new file with the name demokeystore.jks will be created at your the location you executed the command.
2. View the content in the created keystore.
You can execute the following command in order to view the content of the created keystore in step 1.
keytool -list -v -keystore demokeystore.jks -storepass password
You will receive an output similar to
Keystore type: JKS
Keystore provider: SUN
Your keystore contains 1 entry
Alias name: democert
Creation date: Jul 21, 2015
Entry type: PrivateKeyEntry
Certificate chain length: 1
Certificate[1]:
Owner: CN=localhost, OU=wso2, O=wso2, L=colombo, ST=WP, C=LK
Issuer: CN=localhost, OU=wso2, O=wso2, L=colombo, ST=WP, C=LK
Serial number: 2ef9b438
Valid from: Tue Jul 21 18:46:12 IST 2015 until: Mon Oct 19 18:46:12 IST 2015
Certificate fingerprints:
MD5: 2F:1B:EF:8E:95:5D:0E:0F:81:34:FE:4A:27:A9:68:A8
SHA1: FD:9D:98:A1:FB:36:DD:6B:D7:1A:F6:E8:AC:98:35:3A:5E:3C:7F:9A
SHA256: CF:02:15:41:9E:CC:67:65:85:33:4A:E4:3D:B9:C4:C5:B2:04:CD:A8:FF:B6:63:D6:DB:DC:79:85:51:79:FA:1E
Signature algorithm name: SHA256withRSA
Version: 3
Extensions:
#1: ObjectId: 2.5.29.14 Criticality=false
SubjectKeyIdentifier [
KeyIdentifier [
0000: 9B D4 69 A2 D9 A8 E0 22 02 D6 4F 57 71 3B 27 F4 ..i...."..OWq;'.
0010: 18 8E 7F 4F ...O
]
]
*******************************************
*******************************************
3. Create CSR
The certificate in the create keystore is a self-signed certificate. But you need to get your certificate signed by a Certificate Authority(CA). For that a Certificate Signing Request (CSR) has to be generated. You can use the following command for that.
keytool -certreq -v -alias democert -file csr_request.pem -keypass password -storepass password -keystore demokeystore.jks
Then a csr_request.pem file is created in the location that you have executed this command.
4. Get the certificate signed by CA
In this blog post I'm going to use VeriSign free trail version to get the certificate signed. If you are using this trial version the certificate is valid for only 30 day. Follow the wizard in here. When you are asked to give the CSR, open the generated csr_request.pem in a text editor and copy the content and paste in the text area in the wizard. After you have completed the wizard you will be received an email from VeriSign with the signed certificate.
5. Import the root and intermediate certificates to the keystore
Before importing the signed certificate you have to import the root and intermediate certificates to the keystore. The root certificate for VeriSign trial version can be found from here. Copy the text in the root certificate to a new file and save it as verisign_root.pem file
Now you can import the root certificate to the keystore by executing the following command.
keytool -import -v -noprompt -trustcacerts -alias verisigndemoroot -file verisign_root.pem -keystore demokeystore.jks -storepass password
Now the root cert is imported. You can verify that by listing the content in the keystore. (step2)
The next step is to import the intermediate cert file. For the VeriSign trial version you can get the intermediate certificate from here. Copy the text and save that in a new file (verisign_intermediate.pem)
Import the intermediate certificate:
keytool -import -v -noprompt -trustcacerts -alias verisigndemoim -file verisign_intermediate.pem -keystore demokeystore.jks -storepass password
6. Import the CA signed certificate to keystore
Now we can import the signed certificate. You can find the certificate in the email you received from VeriSign. Copy the text file. For and example,
-----BEGIN CERTIFICATE-----
MIIEtTCCA52gAwIBAgIQG+
jTELMAkGA1UEBhMCVVMxHTAbBgNVBA
LgYDVQQLEydGb3IgVGVzdCBQdXJwb3
LTArBgNVBAMTJFN5bWFudGVjIFRyaW
Fw0xNTA3MjAwMDAwMDBaFw0xNTA4MT
CQYDVQQIEwJXUDEMMAoGA1UEBxQDQ0
FAR3c28yMRIwEAYDVQQDFAlsb2NhbG
DwAwggEKAoIBAQC8YacCtuAHjcUheG
LpCd1qfeDkqGVBnoizcCvuqmMy9a6j
igpvOnEAcoDJdmjSMQawSVIy5XO9aL
Vjp/cQQenljSgmw+
STb47324GmlT6PF5T0e0+
dVHqDa3E8YNJNPyqwApOUw5yFUxokA
DTALgglsb2NhbGhvc3QwCQYDVR0TBA
BCQwIjAgoB6gHIYaaHR0cDovL3JlLn
XDBaBgpghkgBhvhFAQcVMEwwIwYIKw
b20vY3BzMCUGCCsGAQUFBwICMBkMF2
A1UdJQQWMBQGCCsGAQUFBwMBBggrBg
iUDnFiFocUQ1XSrQvjA2BggrBgEFBQ
Ly9yZS5zeW1jYi5jb20vcmUuY3J0MA
ok8HP0QJTwRh2J5dwawQKPB9dauqcG
jhdMk51fRkaGtli6N84V5Db7bRYARn
rBtVv47PXIykgXEaGzECrIT/
sGp7lmGWjy01j1mYTfHzVWOKQmiheW
eSy7pIOcy4nvHh7h07UsjivGNIIfQ6
LZtGg2ZrFIsd
-----END CERTIFICATE-----
Create a new text file and past this content and save it as verisign_signed.pem
Import that with the following command
keytool -import -v -alias democert -file verisign_signed.pem -keystore demokeystore.jks -keypass password -storepass password
Now you have the CA signed certificate in your keystore. You can verify that by listing the certificate in the keystore as you did in the step2
As a prerequisite we have to make sure that Java is installed correctly and the class path is set. Then we can follow the following steps
1. Create a key store
You can create your own keystore by executing the following command.
keytool -genkey -alias democert -keyalg RSA -keystore demokeystore.jks -keysize 2048
You will be prompted to give below required information and a password for the keystore.
Enter keystore password:
Re-enter new password:
What is your first and last name?
[Unknown]: localhost
What is the name of your organizational unit?
[Unknown]: wso2
What is the name of your organization?
[Unknown]: wso2
What is the name of your City or Locality?
[Unknown]: colombo
What is the name of your State or Province?
[Unknown]: WP
What is the two-letter country code for this unit?
[Unknown]: LK
Is CN=localhost, OU=wso2, O=wso2, L=colombo, ST=WP, C=LK correct?
[no]: yes
Enter key password for <democert>
(RETURN if same as keystore password):
This generates a private key and the certificate with the alias specified in the command (ex: democert).
Once you executed the above command a new file with the name demokeystore.jks will be created at your the location you executed the command.
2. View the content in the created keystore.
You can execute the following command in order to view the content of the created keystore in step 1.
keytool -list -v -keystore demokeystore.jks -storepass password
You will receive an output similar to
Keystore type: JKS
Keystore provider: SUN
Your keystore contains 1 entry
Alias name: democert
Creation date: Jul 21, 2015
Entry type: PrivateKeyEntry
Certificate chain length: 1
Certificate[1]:
Owner: CN=localhost, OU=wso2, O=wso2, L=colombo, ST=WP, C=LK
Issuer: CN=localhost, OU=wso2, O=wso2, L=colombo, ST=WP, C=LK
Serial number: 2ef9b438
Valid from: Tue Jul 21 18:46:12 IST 2015 until: Mon Oct 19 18:46:12 IST 2015
Certificate fingerprints:
MD5: 2F:1B:EF:8E:95:5D:0E:0F:81:34:FE:4A:27:A9:68:A8
SHA1: FD:9D:98:A1:FB:36:DD:6B:D7:1A:F6:E8:AC:98:35:3A:5E:3C:7F:9A
SHA256: CF:02:15:41:9E:CC:67:65:85:33:4A:E4:3D:B9:C4:C5:B2:04:CD:A8:FF:B6:63:D6:DB:DC:79:85:51:79:FA:1E
Signature algorithm name: SHA256withRSA
Version: 3
Extensions:
#1: ObjectId: 2.5.29.14 Criticality=false
SubjectKeyIdentifier [
KeyIdentifier [
0000: 9B D4 69 A2 D9 A8 E0 22 02 D6 4F 57 71 3B 27 F4 ..i...."..OWq;'.
0010: 18 8E 7F 4F ...O
]
]
*******************************************
*******************************************
3. Create CSR
The certificate in the create keystore is a self-signed certificate. But you need to get your certificate signed by a Certificate Authority(CA). For that a Certificate Signing Request (CSR) has to be generated. You can use the following command for that.
keytool -certreq -v -alias democert -file csr_request.pem -keypass password -storepass password -keystore demokeystore.jks
Then a csr_request.pem file is created in the location that you have executed this command.
4. Get the certificate signed by CA
In this blog post I'm going to use VeriSign free trail version to get the certificate signed. If you are using this trial version the certificate is valid for only 30 day. Follow the wizard in here. When you are asked to give the CSR, open the generated csr_request.pem in a text editor and copy the content and paste in the text area in the wizard. After you have completed the wizard you will be received an email from VeriSign with the signed certificate.
5. Import the root and intermediate certificates to the keystore
Before importing the signed certificate you have to import the root and intermediate certificates to the keystore. The root certificate for VeriSign trial version can be found from here. Copy the text in the root certificate to a new file and save it as verisign_root.pem file
Now you can import the root certificate to the keystore by executing the following command.
keytool -import -v -noprompt -trustcacerts -alias verisigndemoroot -file verisign_root.pem -keystore demokeystore.jks -storepass password
Now the root cert is imported. You can verify that by listing the content in the keystore. (step2)
The next step is to import the intermediate cert file. For the VeriSign trial version you can get the intermediate certificate from here. Copy the text and save that in a new file (verisign_intermediate.pem)
Import the intermediate certificate:
keytool -import -v -noprompt -trustcacerts -alias verisigndemoim -file verisign_intermediate.pem -keystore demokeystore.jks -storepass password
6. Import the CA signed certificate to keystore
Now we can import the signed certificate. You can find the certificate in the email you received from VeriSign. Copy the text file. For and example,
-----BEGIN CERTIFICATE-----
MIIEtTCCA52gAwIBAgIQG+
jTELMAkGA1UEBhMCVVMxHTAbBgNVBA
LgYDVQQLEydGb3IgVGVzdCBQdXJwb3
LTArBgNVBAMTJFN5bWFudGVjIFRyaW
Fw0xNTA3MjAwMDAwMDBaFw0xNTA4MT
CQYDVQQIEwJXUDEMMAoGA1UEBxQDQ0
FAR3c28yMRIwEAYDVQQDFAlsb2NhbG
DwAwggEKAoIBAQC8YacCtuAHjcUheG
LpCd1qfeDkqGVBnoizcCvuqmMy9a6j
igpvOnEAcoDJdmjSMQawSVIy5XO9aL
Vjp/cQQenljSgmw+
STb47324GmlT6PF5T0e0+
dVHqDa3E8YNJNPyqwApOUw5yFUxokA
DTALgglsb2NhbGhvc3QwCQYDVR0TBA
BCQwIjAgoB6gHIYaaHR0cDovL3JlLn
XDBaBgpghkgBhvhFAQcVMEwwIwYIKw
b20vY3BzMCUGCCsGAQUFBwICMBkMF2
A1UdJQQWMBQGCCsGAQUFBwMBBggrBg
iUDnFiFocUQ1XSrQvjA2BggrBgEFBQ
Ly9yZS5zeW1jYi5jb20vcmUuY3J0MA
ok8HP0QJTwRh2J5dwawQKPB9dauqcG
jhdMk51fRkaGtli6N84V5Db7bRYARn
rBtVv47PXIykgXEaGzECrIT/
sGp7lmGWjy01j1mYTfHzVWOKQmiheW
eSy7pIOcy4nvHh7h07UsjivGNIIfQ6
LZtGg2ZrFIsd
-----END CERTIFICATE-----
Create a new text file and past this content and save it as verisign_signed.pem
Import that with the following command
keytool -import -v -alias democert -file verisign_signed.pem -keystore demokeystore.jks -keypass password -storepass password
Now you have the CA signed certificate in your keystore. You can verify that by listing the certificate in the keystore as you did in the step2
Wednesday, December 3, 2014
Invoking ws-secured (username token) service from WSO2 API Manager
In this blog post I'm going to talk about a usecase scenario where I want to invoke a ws-secured web service (username token) via WSO2 API Manager. For the demonstration purposes I use WSO2 DSS to create a ws-secured web service. Here are the steps
1. Download WSO2 APIManager (at the moment 1.7.0) and WSO2 DSS (at the moment 3.2.2)
2. Extract two products zip files. As both products run in the same machine, change the port offset in either of the instance. Here I'm going to do that change in DSS instance. For that edit the carbon.xml (in $SERVER_ROOT/repository/conf) and change the following in the DSS.
<Offset>0</Offset>
to
<Offset>1</Offset>
3. Run the ant script in the DSS samples
4. Start both servers
5. In the DSS server the sample dataservices should be now deployed. Secure the "samples/ResourcesSample" dataservice with username token ws-security policy.


6. Try to invoke the following REST URL with username and password as 'admin'
https://localhost:9444/services/samples/ResourcesSample/products
7. Create an API from API Manager. Go to API publisher and add an API

8. Give the ws-secured service as the endpoint

9. Click on 'Show More Options' link and select 'Secured' from drop down and give admin as credentials.

10. Publish the API. In the API store subscribe to the API and invoke the API with the necessary authorization access token. You will be able to see the result.
1. Download WSO2 APIManager (at the moment 1.7.0) and WSO2 DSS (at the moment 3.2.2)
2. Extract two products zip files. As both products run in the same machine, change the port offset in either of the instance. Here I'm going to do that change in DSS instance. For that edit the carbon.xml (in $SERVER_ROOT/repository/conf) and change the following in the DSS.
<Offset>0</Offset>
to
<Offset>1</Offset>
3. Run the ant script in the DSS samples
4. Start both servers
5. In the DSS server the sample dataservices should be now deployed. Secure the "samples/ResourcesSample" dataservice with username token ws-security policy.
6. Try to invoke the following REST URL with username and password as 'admin'
https://localhost:9444/services/samples/ResourcesSample/products
7. Create an API from API Manager. Go to API publisher and add an API
8. Give the ws-secured service as the endpoint
9. Click on 'Show More Options' link and select 'Secured' from drop down and give admin as credentials.
10. Publish the API. In the API store subscribe to the API and invoke the API with the necessary authorization access token. You will be able to see the result.
Monday, October 27, 2014
Customized login pages in WSO2 IS in OAuth2 flow
Customizing the login page to the server is available for SAML2, OAuth and OpenID flows. In this blog post I'm going to explain how to customize the login page for OAuth2 authentication flow. If you want to know about this on SAML2 the steps are explained in the WSO2 IS docs under customizing login pages. Here, I'm using WSO2 IS 5.0.0 which is the latest release.
1. Check out the source code of the authenticationendpoint web app from the SVN location
2. Modify the existing org.wso2.carbon.identity.application.authentication.endpoint.oauth2.OAuth2Login.java located at src/main/java/org/wso2/carbon/identity/application/authentication/endpoint/oauth2 as indicated below.
In the doGet method change
String applicationName = request.getParameter("application");
to String applicationName = request.getParameter("relyingParty");
with this modification it identifies the application name as the value for "relyingParty" in the request.
3. Build the source and replace the existing <IS_HOME>/repository/deployment/server/webapps/authenticationendpoint.war file with the new war file. Also, delete the existing expanded authenticationendpoint folder at the same location. (Take a backup of the existing authenticationendpoint folder if needed)
4. Start the server
5. Add init parameters to the "OAuth2Login" servlet in the web.xml file located in the expanded web app as below.
<init-param>
<param-name>PugQXfLjByRvHIwHJfSuw2Wh_Koa-LoginPage</param-name>
<param-value>customized_login.jsp</param-value>
</init-param>
The param-name should be in the format
$OAuth_Client_Key-LoginPage
(the client key received at the application registration)
The param-value is the customized page location
6. Place the customized login page at the same level as 'login.jsp'. Also, if there are css files and images then put them inside the respective folders in the authenticationendpoint.
7. Restart the server and you will be able to see the new login page when you login to the web app.
1. Check out the source code of the authenticationendpoint web app from the SVN location
2. Modify the existing org.wso2.carbon.identity.application.authentication.endpoint.oauth2.OAuth2Login.java located at src/main/java/org/wso2/carbon/identity/application/authentication/endpoint/oauth2 as indicated below.
In the doGet method change
String applicationName = request.getParameter("application");
to String applicationName = request.getParameter("relyingParty");
with this modification it identifies the application name as the value for "relyingParty" in the request.
3. Build the source and replace the existing <IS_HOME>/repository/deployment/server/webapps/authenticationendpoint.war file with the new war file. Also, delete the existing expanded authenticationendpoint folder at the same location. (Take a backup of the existing authenticationendpoint folder if needed)
4. Start the server
5. Add init parameters to the "OAuth2Login" servlet in the web.xml file located in the expanded web app as below.
<init-param>
<param-name>PugQXfLjByRvHIwHJfSuw2Wh_Koa-LoginPage</param-name>
<param-value>customized_login.jsp</param-value>
</init-param>
The param-name should be in the format
$OAuth_Client_Key-LoginPage
(the client key received at the application registration)
The param-value is the customized page location
6. Place the customized login page at the same level as 'login.jsp'. Also, if there are css files and images then put them inside the respective folders in the authenticationendpoint.
7. Restart the server and you will be able to see the new login page when you login to the web app.
Monday, September 29, 2014
Writing a Simple AXIS 2 Service
In this blog post I'm going to discuss on how to write a simple axis2 service. Here I'm using code first approach to write the service. First of all, we can start from writing a java class with a simple method.
import org.apache.axis2.context.MessageContext;
import org.apache.axis2.transport.http.HTTPConstants;
public class SimpleService {
public void print(String value) throws PrintException {
if (value ==null) {
throw new PrintException("value is null");
}
MessageContext context = MessageContext.getCurrentMessageContext();
context.setProperty(HTTPConstants.RESPONSE_CODE, 200);
System.out.println("Value = " + value);
}
}
The PrintException method would be
public class PrintException extends Exception {
public PrintException(String message) {
super(message);
}
}
In order to archive this as a valid axis2 service there should be a services.xml associated with the service inside the service archive file. It contains the deployment description of the service.
<service>
<parameter name="ServiceClass" locked="false">SimpleService</parameter>
<operation name="echo">
<messageReceiver class="org.apache.axis2.rpc.receivers.RPCMessageReceiver"/>
</operation>
</service>
The class name should be the fully qualified class name. As in my example the SimpleService class in not in any package I have simply used the class name.
Axis2 has a set of built-in message receivers. According to this sample services.xml file it says that operation 'print' of this service should use the Axis2 Java class 'org.apache.axis2.rpc.receivers.RPCMessageReceiver' as its message receiver class.
If an operation is an in-only operation you can use
org.apache.axis2.rpc.receivers.RPCInOnlyMessageReceiver
Create the archive file using
jar cvf SimpleService.aar *
import org.apache.axis2.context.MessageContext;
import org.apache.axis2.transport.http.HTTPConstants;
public class SimpleService {
public void print(String value) throws PrintException {
if (value ==null) {
throw new PrintException("value is null");
}
MessageContext context = MessageContext.getCurrentMessageContext();
context.setProperty(HTTPConstants.RESPONSE_CODE, 200);
System.out.println("Value = " + value);
}
}
The PrintException method would be
public class PrintException extends Exception {
public PrintException(String message) {
super(message);
}
}
In order to archive this as a valid axis2 service there should be a services.xml associated with the service inside the service archive file. It contains the deployment description of the service.
<service>
<parameter name="ServiceClass" locked="false">SimpleService</parameter>
<operation name="echo">
<messageReceiver class="org.apache.axis2.rpc.receivers.RPCMessageReceiver"/>
</operation>
</service>
The class name should be the fully qualified class name. As in my example the SimpleService class in not in any package I have simply used the class name.
Axis2 has a set of built-in message receivers. According to this sample services.xml file it says that operation 'print' of this service should use the Axis2 Java class 'org.apache.axis2.rpc.receivers.RPCMessageReceiver' as its message receiver class.
If an operation is an in-only operation you can use
org.apache.axis2.rpc.receivers.RPCInOnlyMessageReceiver
Create the archive file using
jar cvf SimpleService.aar *
Thursday, June 19, 2014
WSO2 Task Server - Interfacing tasks from other WSO2 Servers
WSO2 TS (At the moment it's 1.1.0) is released with the following key features
1. Download TS and DSS product zip files and extract them.
2. We are going to run 2 carbon servers in the same machine. Therefore, we need to change the port index of DSS in CARBON_HOME/repository/conf/carbon.xml so that the DSS nodes will run without conflicting with other server.
In carbon.xml, change the following element in order to run the DSS in HTTP port 9764 and HTTPS port 9444.
<Offset>1</Offset>
3. Open the tasks-config.xml file of your carbon server (e,g. DSS Server). You can find this file from the <PRODUCT_HOME>/repository/conf/etc directory. Do the following changes.
4. Set the task server mode to REMOTE.
<taskServerMode>REMOTE</taskServerMode>
By setting this mode, we can configure the carbon server to run it's task remotely.
5. Point the taskclientdispatchaddress to the same DSS server address.
<taskClientDispatchAddress>https://localhost:9444</taskClientDispatchAddress>
6. Remote address URL and credentials to login to the server should be defined.
<remoteServerAddress>https://localhost:9443</remoteServerAddress>
<remoteServerUsername>admin</remoteServerUsername>
<remoteServerPassword>admin</remoteServerPassword>
7. Start the Task Server.
8. Start the DSS Server. You can see it is started in REMOTE mode from the startup logs

9. Now you can add a task from management console of the DSS Server.

10. You can verify that the task is running on the Task Server by the logs printed in the TS logs

- Interfacing tasks in Carbon servers.
- Trigger web tasks remotely
1. Download TS and DSS product zip files and extract them.
2. We are going to run 2 carbon servers in the same machine. Therefore, we need to change the port index of DSS in CARBON_HOME/repository/conf/carbon.xml so that the DSS nodes will run without conflicting with other server.
In carbon.xml, change the following element in order to run the DSS in HTTP port 9764 and HTTPS port 9444.
<Offset>1</Offset>
3. Open the tasks-config.xml file of your carbon server (e,g. DSS Server). You can find this file from the <PRODUCT_HOME>/repository/conf/etc directory. Do the following changes.
4. Set the task server mode to REMOTE.
<taskServerMode>REMOTE</taskServerMode>
By setting this mode, we can configure the carbon server to run it's task remotely.
5. Point the taskclientdispatchaddress to the same DSS server address.
<taskClientDispatchAddress>https://localhost:9444</taskClientDispatchAddress>
6. Remote address URL and credentials to login to the server should be defined.
<remoteServerAddress>https://localhost:9443</remoteServerAddress>
<remoteServerUsername>admin</remoteServerUsername>
<remoteServerPassword>admin</remoteServerPassword>
7. Start the Task Server.
8. Start the DSS Server. You can see it is started in REMOTE mode from the startup logs
9. Now you can add a task from management console of the DSS Server.
10. You can verify that the task is running on the Task Server by the logs printed in the TS logs
Thursday, January 16, 2014
Clustering WSO2 Products with Registry Mounting
In this blog post I'm going to explain how to set up a cluster of WSO2 products using registry mounting. This setup method is applicable to products built using 4.2.0 kernel.
Here I will use WSO2 DSS as the product and WSO2 GREG for registry mounting.
This is what we are going to do!
 GREG will be our central repository which uses MySQL as the database. The two DSS servers will use the same repository for their shared resources.
Now it is time to configure these products.
1. Download DSS 3.1.1 from here
2. Download GREG 4.6.0 from here
3. Create a database in MySQL and assign user priviledges with the following commands.
mysql>create database regdb;
mysql>use regdb;
mysql>grant all on regdb.* TO regadmin@localhost identified by "regadmin";
4. Extract the GREG 4.6.0 zip file and change the configured datasource in $GREG_HOME/repository/conf/datasources/master-datasources.xml file in order to tell GREG to run on top of the MySQL datasource instead of default H2 datasource
For that replace
<datasource>
<name>WSO2_CARBON_DB</name>
<description>The datasource used for registry and user manager</description>
<jndiConfig>
<name>jdbc/WSO2CarbonDB</name>
</jndiConfig>
<definition type="RDBMS">
<configuration>
<url>jdbc:h2:repository/database/WSO2CARBON_DB;DB_CLOSE_ON_EXIT=FALSE;LOCK_TIMEOUT=60000</url>
<username>wso2carbon</username>
<password>wso2carbon</password>
<driverClassName>org.h2.Driver</driverClassName>
<maxActive>50</maxActive>
<maxWait>60000</maxWait>
<testOnBorrow>true</testOnBorrow>
<validationQuery>SELECT 1</validationQuery>
<validationInterval>30000</validationInterval>
</configuration>
</definition>
</datasource>
with the following content
<datasource>
<name>WSO2_CARBON_DB</name>
<description>The datasource used for registry and user manager</description>
<jndiConfig>
<name>jdbc/WSO2CarbonDB</name>
</jndiConfig>
<definition type="RDBMS">
<configuration>
<url>jdbc:mysql://localhost:3306/regdb</url>
<username>regadmin</username>
<password>regadmin</password>
<driverClassName>com.mysql.jdbc.Driver</driverClassName>
<maxActive>80</maxActive>
<maxWait>60000</maxWait>
<minIdle>5</minIdle>
<testOnBorrow>true</testOnBorrow>
<validationQuery>SELECT 1</validationQuery>
<validationInterval>30000</validationInterval>
</configuration>
</definition>
</datasource>
5. Download the MySQL JDBC driver connector JAR from here and place it in the $GREG_HOME/repository/components/lib directory.
6. Start the GREG server with the following command
For Linux : wso2server.sh -Dsetup
For Windows : wso2server.bat -Dsetup
This will start GREG on MySQL and setup the regdb database. The work by GREG is done now.
7. We have to configure DSS products as well. As we are having two DSS instance we have to make two copies.
8. As we are running two WSO2 product instances in the same machine, we have to change running ports for each products. We can change the port by changing the following value in $DSS_HOME/repository/conf/carbon.xml
<Offset>1</Offset>
Then it will run on HTTP port 9764 and HTTPS port 9444.
9. Put the following content to the $DSS_HOME/repository/conf/registry.xml for registry mounting in both DSS instances
<dbConfig name="mysql-reg">
<url>jdbc:mysql://localhost:3306/regdb</url>
<userName>regadmin</userName>
<password>regadmin</password>
<driverName>com.mysql.jdbc.Driver</driverName>
<maxActive>5</maxActive>
<maxWait>60000</maxWait>
<minIdle>50</minIdle>
<validationQuery>SELECT 1</validationQuery>
</dbConfig>
<remoteInstance url="https://localhost:9443/registry">
<id>conf-gov-registry</id>
<dbConfig>mysql-reg</dbConfig>
<readOnly>false</readOnly>
<enableCache>true</enableCache>
<registryRoot>/</registryRoot>
</remoteInstance>
<!-- Governance data will be stored in /_system/governance collection of central registry instance -->
<mount overwrite="true" path="/_system/governance">
<instanceId>conf-gov-registry</instanceId>
<targetPath>/_system/governance</targetPath>
</mount>
<!-- Configuration data will be stored in /_system/dssnodes collection of central registry instance -->
<mount overwrite="true" path="/_system/config">
<instanceId>conf-gov-registry</instanceId>
<targetPath>/_system/esbnodes</targetPath>
</mount>
10. Drop the MySQL driver into $DSS_HOME/repository/components/lib directory which is downloaded in the step5
11. By Default the All WSO2 products starts with STANDALONE mode. We have to tell the DSS product to start in CLUSTERED mode. We can enable it by the setting the following property in $DSS_HOME/repository/conf/axis2/axis2.xml to true
<clustering class="org.wso2.carbon.core.clustering.hazelcast.HazelcastClusteringAgent"
enable="true">
12. We have to tell the cluster how many servers are running explicitly.This can be configured in the $DSS_HOME/repository/conf/etc/tasks-config.xml
<taskServerCount>2</taskServerCount>
With this configuration the server starts first will be waiting for others. (ie. It knows that there are two servers in the cluster and have to wait for the other one.)
12. Now, we are done with the configurations. You can test the clustering and registry mounting through task scheduling. More info available in docs. Once we schedule a task from one DSS instance, that particular task is shared with the other instance as well.
Here I will use WSO2 DSS as the product and WSO2 GREG for registry mounting.
This is what we are going to do!
Now it is time to configure these products.
1. Download DSS 3.1.1 from here
2. Download GREG 4.6.0 from here
3. Create a database in MySQL and assign user priviledges with the following commands.
mysql>create database regdb;
mysql>use regdb;
mysql>grant all on regdb.* TO regadmin@localhost identified by "regadmin";
4. Extract the GREG 4.6.0 zip file and change the configured datasource in $GREG_HOME/repository/conf/datasources/master-datasources.xml file in order to tell GREG to run on top of the MySQL datasource instead of default H2 datasource
For that replace
<datasource>
<name>WSO2_CARBON_DB</name>
<description>The datasource used for registry and user manager</description>
<jndiConfig>
<name>jdbc/WSO2CarbonDB</name>
</jndiConfig>
<definition type="RDBMS">
<configuration>
<url>jdbc:h2:repository/database/WSO2CARBON_DB;DB_CLOSE_ON_EXIT=FALSE;LOCK_TIMEOUT=60000</url>
<username>wso2carbon</username>
<password>wso2carbon</password>
<driverClassName>org.h2.Driver</driverClassName>
<maxActive>50</maxActive>
<maxWait>60000</maxWait>
<testOnBorrow>true</testOnBorrow>
<validationQuery>SELECT 1</validationQuery>
<validationInterval>30000</validationInterval>
</configuration>
</definition>
</datasource>
with the following content
<datasource>
<name>WSO2_CARBON_DB</name>
<description>The datasource used for registry and user manager</description>
<jndiConfig>
<name>jdbc/WSO2CarbonDB</name>
</jndiConfig>
<definition type="RDBMS">
<configuration>
<url>jdbc:mysql://localhost:3306/regdb</url>
<username>regadmin</username>
<password>regadmin</password>
<driverClassName>com.mysql.jdbc.Driver</driverClassName>
<maxActive>80</maxActive>
<maxWait>60000</maxWait>
<minIdle>5</minIdle>
<testOnBorrow>true</testOnBorrow>
<validationQuery>SELECT 1</validationQuery>
<validationInterval>30000</validationInterval>
</configuration>
</definition>
</datasource>
5. Download the MySQL JDBC driver connector JAR from here and place it in the $GREG_HOME/repository/components/lib directory.
6. Start the GREG server with the following command
For Linux : wso2server.sh -Dsetup
For Windows : wso2server.bat -Dsetup
This will start GREG on MySQL and setup the regdb database. The work by GREG is done now.
7. We have to configure DSS products as well. As we are having two DSS instance we have to make two copies.
8. As we are running two WSO2 product instances in the same machine, we have to change running ports for each products. We can change the port by changing the following value in $DSS_HOME/repository/conf/carbon.xml
<Offset>1</Offset>
Then it will run on HTTP port 9764 and HTTPS port 9444.
9. Put the following content to the $DSS_HOME/repository/conf/registry.xml for registry mounting in both DSS instances
<dbConfig name="mysql-reg">
<url>jdbc:mysql://localhost:3306/regdb</url>
<userName>regadmin</userName>
<password>regadmin</password>
<driverName>com.mysql.jdbc.Driver</driverName>
<maxActive>5</maxActive>
<maxWait>60000</maxWait>
<minIdle>50</minIdle>
<validationQuery>SELECT 1</validationQuery>
</dbConfig>
<remoteInstance url="https://localhost:9443/registry">
<id>conf-gov-registry</id>
<dbConfig>mysql-reg</dbConfig>
<readOnly>false</readOnly>
<enableCache>true</enableCache>
<registryRoot>/</registryRoot>
</remoteInstance>
<!-- Governance data will be stored in /_system/governance collection of central registry instance -->
<mount overwrite="true" path="/_system/governance">
<instanceId>conf-gov-registry</instanceId>
<targetPath>/_system/governance</targetPath>
</mount>
<!-- Configuration data will be stored in /_system/dssnodes collection of central registry instance -->
<mount overwrite="true" path="/_system/config">
<instanceId>conf-gov-registry</instanceId>
<targetPath>/_system/esbnodes</targetPath>
</mount>
10. Drop the MySQL driver into $DSS_HOME/repository/components/lib directory which is downloaded in the step5
11. By Default the All WSO2 products starts with STANDALONE mode. We have to tell the DSS product to start in CLUSTERED mode. We can enable it by the setting the following property in $DSS_HOME/repository/conf/axis2/axis2.xml to true
<clustering class="org.wso2.carbon.core.clustering.hazelcast.HazelcastClusteringAgent"
enable="true">
12. We have to tell the cluster how many servers are running explicitly.This can be configured in the $DSS_HOME/repository/conf/etc/tasks-config.xml
<taskServerCount>2</taskServerCount>
With this configuration the server starts first will be waiting for others. (ie. It knows that there are two servers in the cluster and have to wait for the other one.)
12. Now, we are done with the configurations. You can test the clustering and registry mounting through task scheduling. More info available in docs. Once we schedule a task from one DSS instance, that particular task is shared with the other instance as well.
Wednesday, January 8, 2014
Maven 2 Building error : How to sort it out
Today I tried to build a source using Maven 2. In the pom.xml file it is building build.xml file using ant. Then I got the following error.
An Ant BuildException has occured
Perhaps JAVA_HOME does not point to the JDK. It is currently set to /media/chanika/apps/java/java_1.6/jdk1.6.0_45/jre
So the first thing came to my mind is that the path for java JDK is set to as a wrong one. But when I checked the path it has been set correctly.
So I googled a liitle bit and found out this is because of that Maven2 starts the antrun plugin with the JRE not the JDK.
This can be overcome by doing one of the followings.
1. By editing your pom.xml file in order to add tools.jar dependency.
<profile>
<id>tools.jar</id>
<activation>
<property>
<name>java.vendor</name>
<value>Sun Microsystems Inc.</value>
</property>
</activation>
<build>
<plugins>
<plugin>
<groupId>org.apache.maven.plugins</groupId>
<artifactId>maven-antrun-plugin</artifactId>
<dependencies>
<dependency>
<groupId>com.sun</groupId>
<artifactId>tools</artifactId>
<version>1.5.0</version>
<scope>system</scope>
<systemPath>${java.home}/../lib/tools.jar</systemPath>
</dependency>
</dependencies>
</plugin>
</plugins>
</build>
</profile>
2. Or else you can add the following property to your build.xml file
An Ant BuildException has occured
Perhaps JAVA_HOME does not point to the JDK. It is currently set to /media/chanika/apps/java/java_1.6/jdk1.6.0_45/jre
So the first thing came to my mind is that the path for java JDK is set to as a wrong one. But when I checked the path it has been set correctly.
So I googled a liitle bit and found out this is because of that Maven2 starts the antrun plugin with the JRE not the JDK.
This can be overcome by doing one of the followings.
1. By editing your pom.xml file in order to add tools.jar dependency.
<profile>
<id>tools.jar</id>
<activation>
<property>
<name>java.vendor</name>
<value>Sun Microsystems Inc.</value>
</property>
</activation>
<build>
<plugins>
<plugin>
<groupId>org.apache.maven.plugins</groupId>
<artifactId>maven-antrun-plugin</artifactId>
<dependencies>
<dependency>
<groupId>com.sun</groupId>
<artifactId>tools</artifactId>
<version>1.5.0</version>
<scope>system</scope>
<systemPath>${java.home}/../lib/tools.jar</systemPath>
</dependency>
</dependencies>
</plugin>
</plugins>
</build>
</profile>
2. Or else you can add the following property to your build.xml file
<property name="build.compiler" value="extJavac"/>
Thursday, September 26, 2013
How to connect to Cassandra using WSO2 DSS
WSO2 Data Service Server supports exporting data as a web service, called a data service. It can connect to various data sources and expose those data to do operations on them. This post will guide you to use a Cassandra data source using WSO2 DSS.
1. Download Cassandra from here and install (You may have to change some configurations. Please refer this).
2. Create a keyspace, table and store some data
Now we will look into how to configure DSS
3.You can download DSS from here
4. Extract the pack and goto $DSS_HOME/bin folder and run sh wso2Server.sh (if you are a Windows user run wso2Server.bat file)
5. Add a data source. This step has been described in details here
6. You can test connection and save it
7. Deploy data service
The important thing that I would like to address in here is the versions compatibility of WSO2DSS and Cassandra jdbc drivers.
1. Download Cassandra from here and install (You may have to change some configurations. Please refer this).
2. Create a keyspace, table and store some data
Now we will look into how to configure DSS
3.You can download DSS from here
4. Extract the pack and goto $DSS_HOME/bin folder and run sh wso2Server.sh (if you are a Windows user run wso2Server.bat file)
5. Add a data source. This step has been described in details here
6. You can test connection and save it
7. Deploy data service
The important thing that I would like to address in here is the versions compatibility of WSO2DSS and Cassandra jdbc drivers.
- The WSO2 DSS version older than 3.1.0 compatible with Cassandra JDBC 1.1.1. By default the Cassandra 1.1.x supports CQL (Common Query Language) 2. CQL3 is released with much more functionalities than CQL2 such as schema-free feature.
- But you can connect to CQL3 by starting the Cassandra server with the following command ./cqlsh -3
- From WSO2 DSS (older version starting from 3.0.1) you have to specify the connection url as below. jdbc:cassandra://localhost:9160/keyspace_name?version=3.0.0
- If you do not specify the version in the URL it will connect to CQL2 by default
- But from DSS version 3.1.0 onward it supports Cassandra JDBC 1.2.x and because of that, it will connect to CQL3 by default.
Wednesday, September 25, 2013
Escape non printable characters in WSO2 DSS
WSO2 Dss can be used to expose data from different data sources (ex: MYSQL, ORACLE) as a web service. Escaping non printable characters is a feature introduced from WSO2 DSS 3.1.0 onward.
Lets say in your database there are characters which cannot be printed. But you cannot replace or delete them as those are the data you have. But if you want to retrieve those data through a web service it will not allow to do so as they cannot be represented. For an example when you are invoking a data service (using soap-ui or try-it) and do a select query for a data contains characters which are not in printable format it will throw the following exception.
If it is selected the corresponding characters will be replaced by ? and if it is not, then it will throw the above exception. Find more from here.

Lets say in your database there are characters which cannot be printed. But you cannot replace or delete them as those are the data you have. But if you want to retrieve those data through a web service it will not allow to do so as they cannot be represented. For an example when you are invoking a data service (using soap-ui or try-it) and do a select query for a data contains characters which are not in printable format it will throw the following exception.
ERROR {org.wso2.carbon.dataservices.core.description.query.SQLQuery} -  DS Fault Message: Error in XML generation at StaticOutputElement.execute
DS Code: UNKNOWN_ERROR
Nested Exception:-
com.ctc.wstx.exc.WstxIOException: Invalid white space character (0x5) in text to output
 {org.wso2.carbon.dataservices.core.description.query.SQLQuery}
DS Fault Message: Error in XML generation at StaticOutputElement.execute
DS Code: UNKNOWN_ERROR
Nested Exception:-
com.ctc.wstx.exc.WstxIOException: Invalid white space character (0x5) in text to output

 at org.wso2.carbon.dataservices.core.engine.StaticOutputElement.execute(StaticOutputElement.java:232)
 at org.wso2.carbon.dataservices.core.engine.OutputElementGroup.execute(OutputElementGroup.java:121)
 at org.wso2.carbon.dataservices.core.description.query.Query.writeResultEntry(Query.java:339)
 at org.wso2.carbon.dataservices.core.description.query.SQLQuery.processNormalQuery(SQLQuery.java:822)
 at org.wso2.carbon.dataservices.core.description.query.SQLQuery.runQuery(SQLQuery.java:2034)
 at org.wso2.carbon.dataservices.core.description.query.Query.execute(Query.java:254)
 at org.wso2.carbon.dataservices.core.engine.CallQuery.execute(CallQuery.java:161)
 at org.wso2.carbon.dataservices.core.engine.CallQueryGroup.execute(CallQueryGroup.java:118)
 at org.wso2.carbon.dataservices.core.description.operation.Operation.execute(Operation.java:73)
 at org.wso2.carbon.dataservices.core.engine.DataService.invoke(DataService.java:598)
 at org.wso2.carbon.dataservices.core.engine.DSOMDataSource.execute(DSOMDataSource.java:135)
 at org.wso2.carbon.dataservices.core.engine.DSOMDataSource.serialize(DSOMDataSource.java:147)
 at org.apache.axiom.om.impl.llom.OMSourcedElementImpl.internalSerialize(OMSourcedElementImpl.java:691)
This happened as those characters cannot be serialized to xml when they are going to be printed. But with this newly added feature you can define to escape the those characters with '?' when you define output mapping in the process of creating the data service. You can select "Escape Non Printable Characters" from the UI.
If it is selected the corresponding characters will be replaced by ? and if it is not, then it will throw the above exception. Find more from here.

Subscribe to:
Posts (Atom)